
1. Download robboscratch-3.77.0-bluetooth-firmware-x64.exe - this is the RobboScratch 3 version just for configuring the Bluetooth module on the robot.
2. Run the installation.
3. If you already have installed the standard version of RobboScratch, follow the steps below:
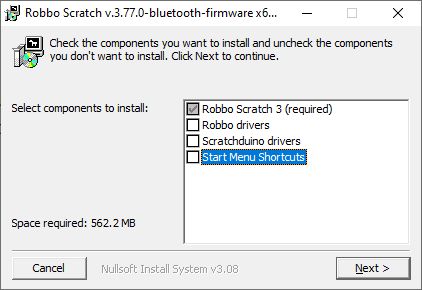
1) uncheck the Start Menu Shortcuts check box:
2) Change the name of the installation folder in the Destination folder line
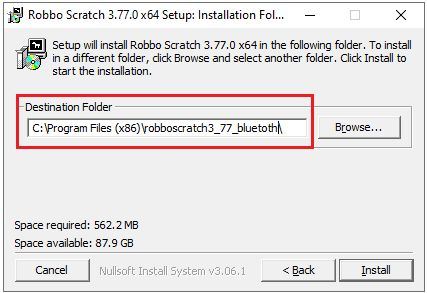
2) Change the name of the installation folder in the Destination folder line
4. Click Install and wait for completion.
5. Go to the folder you specified in the Destination folder in the previous step and run RobboScratch.
In the screenshot, this is the robboscratch_3_77_bluetooth directory.
6. Go to Robbo Menu > About > and check that the program version is listed as Robbo Scratch v.3.77.0-bluetooth-firmware.
7. Connect Robokit to PC with usb cable.
8. Install and start Arduino IDE.
9. Click File > New.
10. Click Tools > Board > Arduino AVR Boards > Arduino NANO.
11. Click Tools > Processor > Atmega328P Old Bootloader.
12. Click Tools > Port and select the port of the connected device.
You can view the device port in Device Manager. If you have only 1 device connected to the computer, there will be only 1 port and it will be displayed in Arduino IDE.
13. Click File > New and click  to load a blank sketch onto the board.
14. Wait for the message that the upload is complete.
15. Go to Robbo Scratch 3.77.0-bluetooth-firmware-x64 and click Search Devices.
16. Wait for the message to firmware the device and confirm the firmware download.
Wait until firmware is complete.
17. If the message to flash the device appears again, cancel the process.
18. Disconnect the robot platform from the PC.
19. Insert the battery.
Please note that the Robot will move forward slightly when the power is applied.
20. The code you downloaded will start the Bluetooth setup.
During the setup process, the module name will be set to match the serial number of the device.
After successful setup, the LED located by the USB connector will start blinking rapidly.
21. After the setup process is complete, disconnect the battery and reconnect the robot from the PC.
22. Run the standard version of Robbo Scratch.
By standard version we mean the release version you have worked with before, e.g. version 3.5.
23. Wait until the button  turns green. This means that the robot is connected to RobboScratch.
24. Disconnect the USB of the robot from the PC, insert the battery, and connect the robot platform via Bluetooth.
You have completed the Bluetooth setup in the robot.
You will no need Robboscratch_3_77_bluetooth anymore, to uninstall this program, go to the folder with the installed program and run the uninstall.exe file.